Equipment in Astrophotography
Telescopes
Well this should be an obvious one. Naturally, for shooting the night sky you need some kind of lens. Telescopes are commonly used, but so are zoom lenses. And what is a zoom lens but a telescope with a variable focal length? Telescopes comes in 2 main types, though there are a few outlying exceptions:
Refractor Telescopes: Refractors use a glass lens on the front to gather light and are probably what you think of when imagining a telescope. Your eyeballs, eyeglasses, binoculars, camera lenses, and rifle scopes are all examples of refractors.
They come in many focal lengths; with DSLR lenses they are most often seen in the 5mm-300mm range (they can be longer, but the price quickly rises), but “proper” telescopes will mostly be found in the range of ~300mm-1200mm, again with some exceptions. Many astrophotographers start off here, using DSLR lenses or small refractors since they offer forgiving focal lengths. While a good DSLR lens may range from $400-600 (for wider-mid fields), a near-perfect refractor is often $1200 to several thousand for larger models.

A 4in / 100mm Refractor from AstroTech
Reflecting Telescopes: These telescopes use mirrors to gather light. These are often larger than refractors, at least at a given price, since mirrors are cheaper than lenses at an equivalent diameter and quality.
Reflectors can be all sorts of focal lengths, from wider-field Newtonians in the 400mm range to deep field SCTs which can be 2000mm or more. Despite their size these telescopes are not necessarily prohibitively expensive, though larger models will certainly have a high price point. An 8” SCT may run from $700-1500 depending on the quality of the field, but the Celestron model seen below is offered as large as a 14” diameter which is much more expensive.
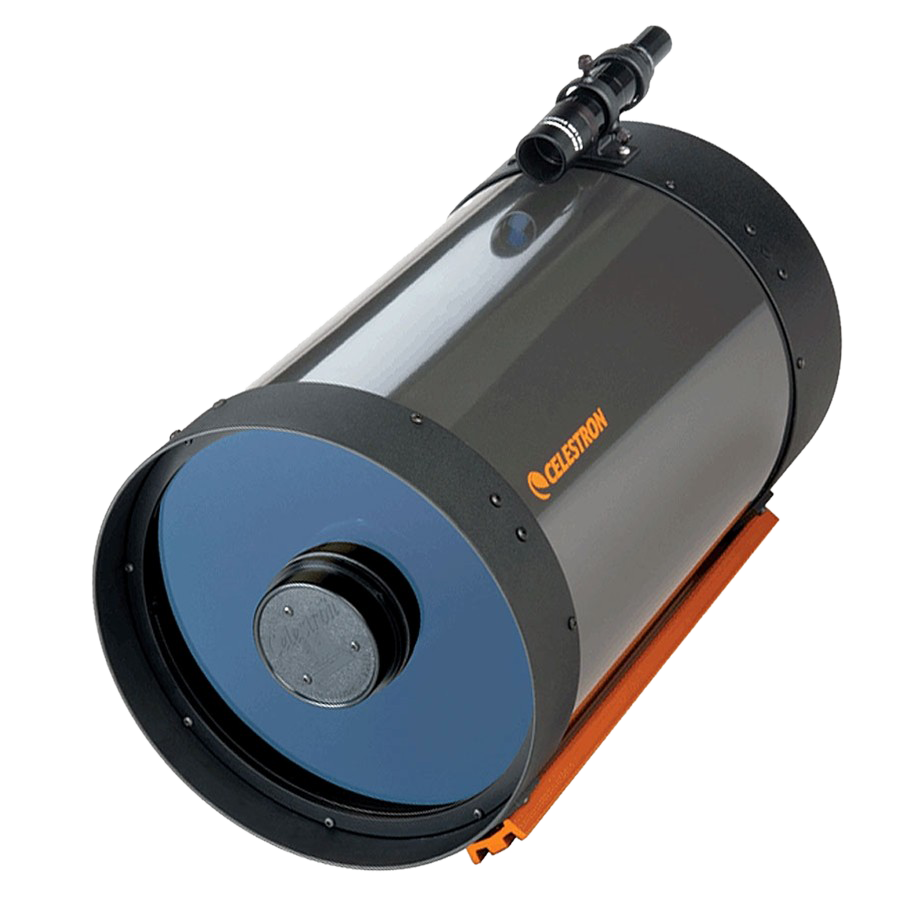
An 8in / 205mm SCT from Celestron
The reason telescopes can be so expensive is not only due to their size, but the quality of their design. Many cheaper telescopes experience uneven fields or color aberration, meaning the stars on the edge of the field of view may be warped or discolored throughout. Additional lenses may be needed (and more expensive models often have these additional lenses built into the design) to correct for these problems so the telescope can yield even fields and correctly colored images.
Cameras
With visual astronomy, the telescope is used to gather light and focus it on a point occupied by your eyeball (well, with an eyepiece). With astrophotography, we simply replace the eyeball with a camera sensor. Contrary to what you may think, many astrophotographers use fairly standard or “cheap” cameras to take their shots. My first two cameras were a Canon Rebel XSi and T3i, both of which can be found for perhaps a few hundred dollars, and neither were top-of-the-line models when I began using them in 2016 and 2017 (and even in 2020 I still use the T3i every now and then). Even smartphone cameras can be used for decent photos of the Moon by simply holding the camera up to the telescope’s eyepiece, and the newest models are actually becoming surprisingly proficient at taking rudimentary long exposure images.
Cameras (read as: Digital SLRs) tend to have issues of their own regarding use in long exposure photography. The short version is that your standard DSLR is inefficient at capturing wavelengths found in distant nebula and the long exposure required can introduce a lot of camera noise, at least in comparison to some other solutions below. More details regarding camera noise - and how we reduce it - can be found in the Part I and Part II pages discussing the process of astrophotography.

The pattern of color filters on a typical DSLR sensor

Representation of a typical DSLR’s Red sensitivity
Bayer Matrix: Most consumer cameras actually shoot in black and white - the ability to take color images is due to the use of a very small array of color filters placed over the camera sensor. This Bayer filter is arranged with one Red pixel, one Blue, with the remaining two being Green. The problem is green is not commonly seen in space, meaning most of the common wavelengths produced by deep sky objects only have a 25% chance of hitting the correct part of the filter.
Infrared cutoff: While the bayer filter does a good job of reducing efficiency in capturing signal, the camera also has other filters in front of the sensor to reduce UV and IR. For daytime photography this is fine since it reduces haze, but the IR-cut filter also cuts into the visible red part of the spectrum, unfortunately reducing the camera’s ability to capture a particular wavelength of red light produced by many deep space nebula. The solution used by many astrophotographers is to disassemble their cameras and remove this IR filter, after which they refer to their cameras as “IR modified.”
Mirror shake: DSLRs are designed with short exposure in mind. The click of the shutter does not affect the fast daytime shots captured in hundredths to thousandths of a second, but for long exposure nighttime imaging it may introduce vibrations which adversely affect the “roundness” of stars.
Dedicated Astronomy Cameras are a solution to some or all of these problems. These types of cameras use similar sensors as a typical DSLR but they are made with night sky imaging in mind. They are often manufactured without a Bayer matrix (see the Filters section below), use no moving parts, and while they do contain IR and UV filtering, they are designed to not obstruct the more important wavelengths found in our night sky. Some also include onboard electric cooling which can reduce camera noise while taking long exposures.
Used and modified DSLRs like the IR-modified T3i can be found for $300-400 on Cloudy Nights Classifieds. Newer DSLR models naturally have a higher price point, and dedicated astronomy cameras like the red ZWO model seen below can range from $150-2000+ depending on several factors including efficiency (how well they capture light), color vs mono, the presence of onboard cooling, and whether the camera is designed for high-speed planetary imaging or long exposure for deep sky.

A Canon DSLR compared to a Dedicated Astronomy Camera from ZWO
Tracking Mounts
Despite the insistence of Flat Earthers around the globe, the Earth does rotate, and that is quite an obstacle when taking long exposure since the stars appear to be moving. Astrophotography can be accomplished at shorter focal lengths using widefield lenses on a static tripod but the exposure times are constrained by either the 500 Rule (for Full Frame sensors) or the 300 Rule (for Crop Sensors). This means either 500 or 300 divided by the focal length of the lens is the maximum exposure recommended to capture round stars. Widefield shooting can create excellent images but longer focal lengths used for capturing detail on night sky objects will be severely limited in their exposure time as a result. The solution is set the camera onto a platform which tracks against the Earth’s rotation. Not all tracking platforms are created equal, and not all are made to support the pursuit of long exposure.
Alt/Az Mounts: These types of tracking mounts use two directions of movement, up/down (Altitude) and left/right (Azimuth) with respect to the ground beneath them. These directions of movement can allow for a motorized telescope to track the night sky, but do not allow for good long exposure photography. In an Alt/Az system, an object rising in the East will appear to slowly twirl throughout the night until it sets in the West after apparently flipping 180 degrees. This is called Field Rotation, and attempting long exposure images in such a system would result in a smearing effect which becomes increasingly pronounced near the edges of the image.

The first stars of a constellation to rise are also the first to set, but an Alt/Az Mount will remain upright either way, leading to Field Rotation
Equatorial (EQ) Mounts: A solution to Field Rotation is to tilt the Azimuth axis of the telescope to be coaxial to the North Celestial Pole (or South if you’re reading this from the upside down part of the planet), which is the center point of rotation in our night sky. Instead of Azimuth, we call this East/West movement Right Ascension. The perpendicular axis measuring North/South position is called Declination, where 0 is located on the equator and the poles are measured as +/- 90 degrees. EQ mounts allow long exposure since the Right Ascension axis is parallel to the rotation of the Earth, eliminating field rotation.

Two Celestron Mounts; An Equatorial CGEM (Left) & a NexStar Alt-Az Mount (Right)
Tracking mounts are the foundation of any dedicated astrophotographer’s setup. A poor mount will forever tarnish images with non-round stars, limited exposure times, and ruined exposures due to poor tracking. Expect to spend most of your budget on the mount, at least at first. A solid tracking mount such as a Celestron CGEM / Skywatcher EQ6 / Orion / Orion Atlas could cost somewhere around $1500 but the investment is worthwhile for most. Better models offer higher payload capacities (they can handle heavier / larger telescopes) for higher prices, and higher-tier commercial mounts can reach into 5 figures.
Guiding
No drive system is perfect, and tracking platforms are no exception. A decent equatorial mount will permit exposure times of a few minutes or more (depending on the specifics) but ultimately most consumer-grade mounts will still experience some oscillation or imperfections in their tracking.
The solution to this is to give the tracking platform a way to see, and this is the function of guiding. In previous decades this was done manually by using a reticled eyepiece through a secondary telescope aligned with the main imaging telescope. An astrophotographer would stare through this guidescope at a star and make small tracking adjustments as needed with a hand control to keep the star centered - and this would continue for possibly several minutes to significant portions of an hour until he was satisfied that the film was properly exposed.
These days the process is much less tedious. Small webcam-like cameras called autoguiders can be used in place of our eyes and guiding software allows these cameras to continually communicate small adjustments to the motors on the tracking mount based on the movement of a star in their field of view. Autoguiding enables significantly longer exposure times since the tracking is able to account for any imperfections in the gears physically moving the telescope.

The Orion 50mm guidescope is a common purchase for those using small refractors
Filters
Filters in photography have all kinds of uses. For daytime photography, filters are often used to assist the camera in maintaining white balance through cutoff of Infrared or Ultraviolet light, reduce haze or reflections, and enhance contrast. Filters cut off unhelpful parts of the light spectrum which can decrease photo quality, though the definition of “unhelpful” will vary when going from daytime photography to nighttime long exposure.
Light pollution can be a major obstacle for night time long exposure, particularly in larger coastal cities where the nearest dark site may be hours of driving away. The solution in this case is to use a filter which blocks wavelengths typically associated with light pollution. Many streetlamps use Sodium or Mercury cores and these glow at precise frequencies, so using filters which block these emission lines can allow light-polluted skies to still be useful. This is not a perfect solution by any means, but can enable a city-bound astrophotographer to at least take some short but usable exposures - rather than none at all.
A chart showing the bandpass of a Light Pollution filter which blocks several streetlight wavelengths. CREDIT: STARIZONA
Monochrome Broadband
Remember those Dedicated Astronomy Cameras I mentioned above? Some of them don’t have a Bayer filter and can shoot in black and white. In order to take a color photo you need a filter wheel which contains a set of Red, Green, and Blue glass. These are rotated in front of the camera during 3 separate exposures and can be combined into a color image later. While this may seem like a disadvantage since acquiring a color image requires 3 photos instead of 1, removing the bayer filter allows a higher Signal to Noise ratio in the final image since 25-50% of the photons are no longer rejected by the color matrix.

Filter wheels like this usually have room for RGB filters and more
Narrowband
The nice thing about deep space nebula is they are predominantly made of Hydrogen. Much like a neon sign, hydrogen atoms emit a specific color of red light when excited by an energy source, such as the radiation from nearby stars. Filters made to block all light except for this wavelength are often used to take higher contrast images. Similar filters exist for other wavelengths corresponding to Oxygen, Sulfur, Hydrogen-Beta, Nitrogen, and more.
The Heart Nebula, first in Luminance (all photons in the human visual spectrum) versus narrowband Hydrogen-Alpha
Narrowband filtering is often the savior of astrophotographers living in light-polluted areas. While broadband color may be out of reach, narrowband effectively blocks most light pollution and offers the ability to take false color images by combining Hα, Oiii, and Sii into the Red, Green, and Blue channels of a color image.
If you want to learn more about filters and how we use them, please see the Filters page of this FAQ
Motorized Assistance & Remote Control
One of the difficulties in shooting deep sky long exposure images is that adjusting focus, changing filters, and altering camera settings often involves touching the equipment with our dirty ape hands. The solution to this involves adding laptop control and motors to some of the components on the telescope. Laptop (or tablet, as the technology is quickly evolving) control of a telescope greatly reduces the vibration imparted by physically adjusting camera settings on the camera itself, and motorized filter wheels or focusers almost entirely remove any need to touch the telescope assembly at all. Many dedicated astrophotographers will max out their automation options and even control their telescope from indoors via Remote Desktop Connection.
As I write this, my telescope is outdoors taking photos of the M33 Galaxy. Aside from physically carrying the tripod outside and taking off the lens caps, I am able to control every part of the setup from the comfort of my office using a remote desktop connection. Through USB control I can point the tracking mount as though I were standing outside entering coordinates into the hand control. My Focuser and Filters Wheel are both motorized, and a Pegasus Power Box allows me to monitor voltage use, outdoor temperature, and local humidity.
This is hardly the most sophisticated example. Many rent time on truely remote observatories which are on other parts of the world, photographing at will with full control over even the motorized roof of the observatory. The general truth is that the more money spent on this hobby, the more time you regain as a result. Automation or motorized accessories are a hidden cost of astrophotography, but one which often pays for itself over time - at least if you can put a price on an uninterrupted night of sleep.
Astrophotography Equipment can involve significant automation (taken at OkieTex 2019)
PC Hardware & Software
* indicates freeware
Last, but definitely not least, is the software required to control much of the equipment listed above. Fortunately the increasingly widespread skill of coding is making this process easier by the day. Astrophotography software - a surprising amount of which is free - is able to control the camera and exposure times, filter wheels, focuser, where the telescope is pointed, and more, all while allowing the different components to effectively communicate with each other so dithering or filter changes only happen between photos. Common telescope control software includes:
Astrophotography Tool - Comprehensive control program for cameras and other equipment
Backyard EOS / Bakcyard Nikon - Camera control for Nikon/Canon DSLRs
*NINA - Comprehensive control program for cameras and other equipment
Sequence Generator Pro - Comprehensive control program for cameras and other equipment
*Sharpcap - Comprehensive control program for cameras and other equipment
*PHD2 - Control program for autoguiding cameras
A high-performance PC is not needed to run any of the capture programs, but it does help for image processing. Often times the only difference between a high-end Gaming PC and a Photo processing PC is that many of the programs below tend to be more RAM and CPU-intensive, while Gaming leans more on a GPU. Anyway, taking photos is only half the battle as we also need a way to compile and edit them:
*Autostakkert - Planetary image stacker
*Deep Sky Stacker - Deep Sky image stacker
Lightroom - Basic Image editor
Photoshop (or GIMP for Linux users) - Image editing
PixInsight - The current King of astrophotography processing software
*PIPP - Planetary imaging analyzer / stabilizing software
*Registax - Planetary stacking and processing
Siril - Image Processing
StarNet - useful for removing Stars from images
StarTools - Image processing
Additional Information
Want to see how this hardware and software is used for capture and photo editing? Check out the other pages on the FAQ for more information on Image Capture & Photo Processing.