How Does Astrophotography Work, Anyway?
This section will cover the process of capturing photos of space. To see how night sky photos are edited, please see Part II
Signal To Noise (SNR)
If you take away one thing from this page (and the Part II section covering post-processing edits), it should be that Astrophotography is the practice of maximizing signal and reducing noise. Much of the capture and processing techniques used in taking photos of the night sky is in pursuit of this goal, though there is an undeniable aesthetic component in how we edit our images as well. Take two photos of the Andromeda Galaxy, for example, and the better (brighter, smoother, perhaps higher in contrast) one will most likely be the one with the best SNR, at least all else being equal. That is not to say a single-shot and (mostly) unedited photo can’t capture something amazing, as seen in NASA’s APOD from August 12, 2018, but capturing the transit of a brilliant meteor across a galaxy relies much more on chance than intent or planning. The focus for this page will be on the variables for which we can account, including image stacking, calibration frames, and other “controllable” strategies.
Most of this is written with deep field astrophotography in mind. Milky Way landscape or high-speed planetary photography benefits from almost everything I’ve written on this page, but it does have some differences in how the images are edited as well as expectations regarding gradients, color, and shooting conditions. I should also clarify that these pages are written as a basic primer and as such may lack some nuance often present in real Astrophotography.
Signal and Noise Definitions
Loosely defined, “Signal” is everything which is real and “Noise” is everything in the way - though in reality the distinction is more complicated. Signal mostly takes the form of photons streaming down through our atmosphere and into the telescope, but the camera may also pick up photons caused by Light Pollution, light from aircraft or satellite trails, or even the glow of the Moon. The photons from these unwanted sources are indeed “real,” but each harm our efforts in taking clean and unobstructed night sky images.
Noise is largely a variety of “false positives” which appear in an image simply due to the construction of the camera or the processes involved in the creation of an image from the camera sensor. A digital camera must apply voltage to the sensor in order for it to detect photons and form an image, and this can cause varying kinds of inaccuracies in the resultant photo. The nuance of various types of noise, and how to best deal with them, will be covered in more detail below.
Lastly, a third category which falls under the “everything in the way” side of things, but is not related to camera noise, is defects related to the physical construction of the telescope. Low quality optics can cause night sky images to have uneven fields (dark corners and bright centers are common, or abnormal stars shapes) and mechanical imperfections can result in stars being out of focus in one or multiple corners of the image.
Data Acquisition
Maximizing SNR from the Telescope
Long Exposure
A good first step is to usually take some photos of the night sky - all the other steps I list below don’t help lacking some actual space photos. The vast majority of night sky images you will see are compiled from multiple exposures, usually all taken with the same settings. For example, if the target of choice for a clear night is the M33 Galaxy, I may capture 50 five-minute exposures, which is often denoted as 50x300” (300” = 300 seconds = 5 minutes). These exposures of the night sky are called Light Frames or “Subs,” which is short for ‘subexposures.’ Capture can be accomplished by physically clicking the shutter release button, but this can quickly become tedious and counterproductive since physically clicking the button with our clumsy ape hands will likely introduce vibrations into the tracking mount and may cause the stars to smear as a result. A remote shutter release or laptop control via USB is usually a much better option to keep the system hands-free.
If you are confused by this since you would assume the stars would trail out of the camera’s view as the Earth rotates over these 5 minutes, the page on Equipment should answer these questions. For a short explanation here, astronomy and astrophotography commonly use slowly-moving platforms which are designed to counteract the apparent movement of the night sky, allowing these long exposure photos to be taken.

A single Light frame of the M81 and M82 Galaxies taken with a T3i through a C8 telescope at 1280mm
The reason long exposure is used is two-fold. First, these are low-light objects and capturing enough photons of them can take time. The exception to this rule is planetary objects like the Moon, Planets, and the (filtered) Sun, which mostly use sub-second exposure times since they can overexpose so easily. Still, trying to separate short and long exposure is somewhat arbitrary, and the main discernible difference is the type of camera noise which will be the most problematic.
Speaking of camera noise, that is the second reason for using long exposure. Every image generated by the camera sensor will have fluctuations in pixel values across the photo, and this is called Read Noise. This variance is random and independent of exposure time, so a 1/100th-second exposure and a 10-second exposure photo will generate the same amount. One of the best ways to combat Read Noise is to take a long enough exposure that even the darkest parts of the image receive enough Signal to overwhelm these random values. In this regard, the 10s exposure will have a much better chance of overwhelming the Read Noise as compared to the 1/100th-second exposure. For daytime photography this is not as much an issue since it usually involves well-lit subjects, but for nighttime imaging long exposure is needed to compensate.
Image Stacking
Assuming the Light Frames all have a good SNR, what little Read Noise that remains in each image will be reduced to minimal levels via Image Stacking. This process involves taking the value of a given pixel across all the aligned Light Frames and generating a new photo using averages. So while the pixel values generated by Read Noise will vary a certain amount across all Lights Frames, the pixel values of the Signal (stars, nebula, etc) will all be nearly identical. The result is that the Read Noise will be reduced to a dim but smooth background, and the overall SNR of the image will be increased. A stacked image is sometimes referred to as a Master Light Frame.

A comparison of IC 434. 5 minutes of exposure has much less SNR than a combined 12.5 hours stacked together
As an aside, image stacking can be used for daytime photography for anything nice enough to stand perfectly still for a few shots. Clouds, landscapes, wildlife - image stacking benefits them all.
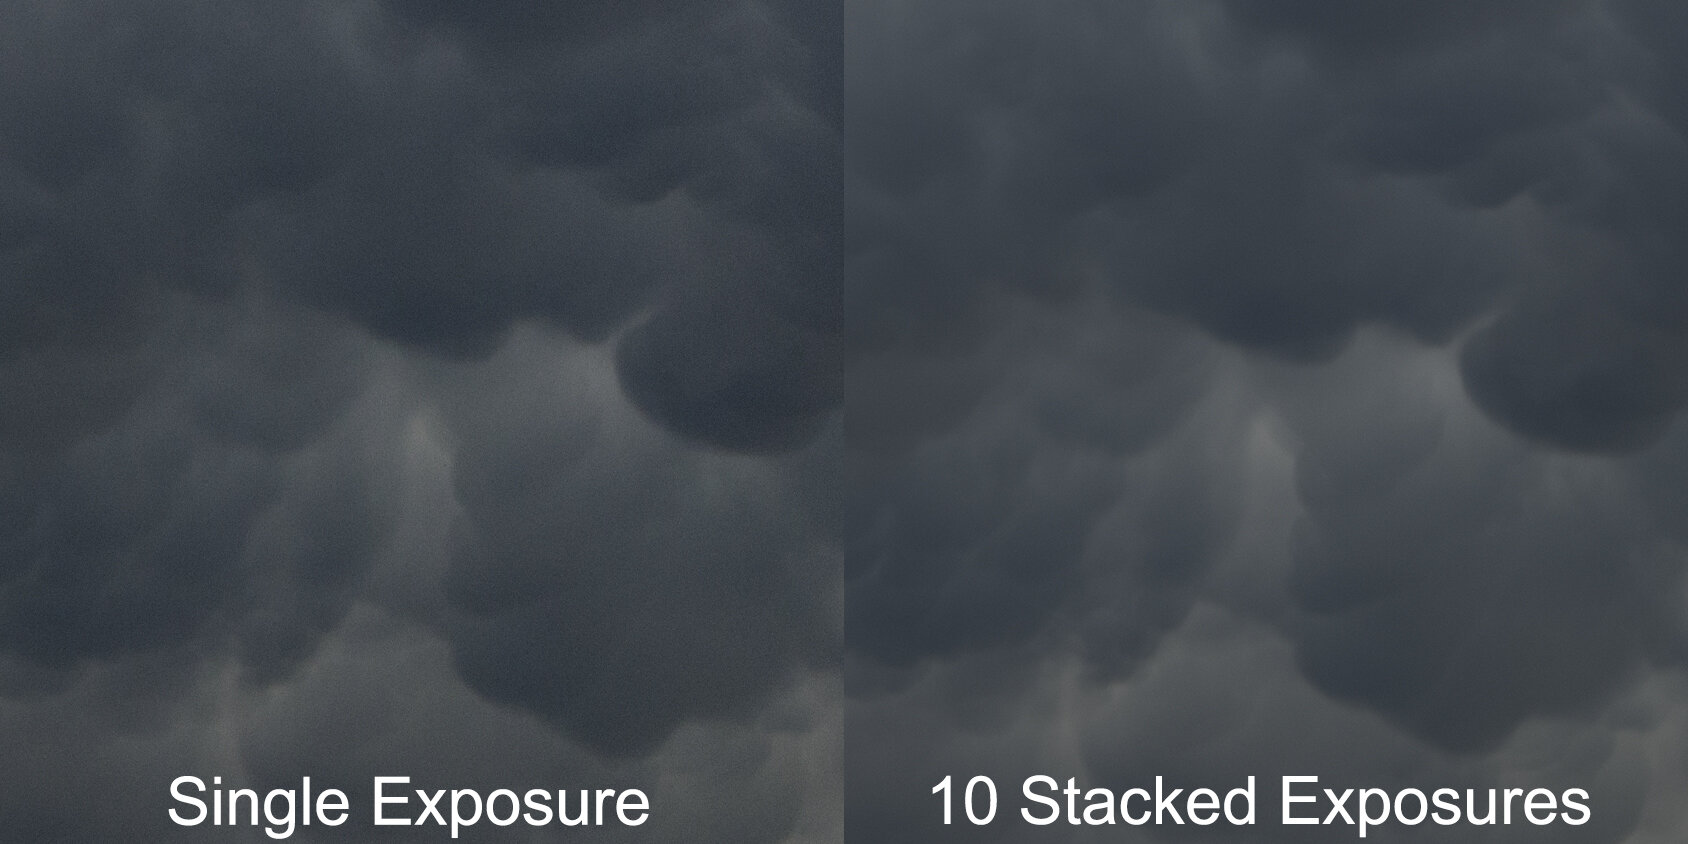
Mammatus Clouds from a 2019 Storm. Notice the reduction in “grain” across the image
Sigma Clipping & Pixel Rejection Algorithms
Describing Image Stacking as “averaging” was a simplification and there is often more to it. Any stacking program worth its time will also have smarter methods to ensure a cleanly stacked image. Not every Light frame may be the same, and at times our sky can be quite busy. A plane or satellite can leave a streak of light through an image, and in the summer even fireflies can be a problem.

A single 5-minute exposure on the Orion Nebula occulted by an aircraft
The solution for this is outlier rejection. 1 Light Frame may have a streak of pixels corresponding to the path of an aircraft’s indicator lights, but if another 19 don’t then these pixels can be rejected in favor of the average. Still, outlier rejection only works on aspects of your Light frames which change. Unfortunately, cameras also generate pattern-specific (or non-random) noise related to physical construction and sensor heat, and this most often presents itself as vertical/horizontal striping, hot pixels, and amp glow (shown below).
Pattern Noise
Thermal Noise & Dark Frames
Thermal Noise is more of a general term, but I’ll use it here to describe about any kind of noise which is caused by the camera’s internal components heating during long exposure. This will be visible in primarily two ways, first with Hot Pixels, and sometimes with Amp Glow.
Hot Pixels show up in images as bright saturated spots - some pixels on the sensor could be slightly more sensitive, or maybe that particular site received more electrons than normal, causing it to saturate, or turn white. On color cameras these will usually appear as bright Red, Green, or Blue spots since whichever pixel saturated will be read out as a specific color.
Hot Pixels (highlighted) from a T3i Light Frame
Amp Glow (or “Dark Current”) is specific to each camera model. Depending on the arrangement of internal electronics inside a camera, the sensor may receive excessive heat from an adjacent power conduit or circuit board, which can cause Amp Glow, as seen in an image taken from a ZWO ASI183 camera below. This is why keeping your DSLR screen off during long exposures is a good idea - many camera have the screen’s power wired close enough to the camera sensor that if the screen is on, the images will have a noticeable glow on one side.

An example of particularly severe Amp Glow from the ZWO ASI183 sensor
The best way to remove pattern noise is to use the pattern against itself by isolating and subtracting it from the Lights. If a certain pattern of noise can be generated under specific conditions (exposure time, Gain / ISO, and sensor temperature being the most important factors), then capping the end of the telescope or lens can allow the capture of only the camera noise. Such photos are imaginatively called “Dark Frames.” Proper Dark frames will be the same exposure time and Gain / ISO as your Lights, and should be as close to the same temperature as possible. Some DSLRs feature a variation of this in that they can be set to run automatic noise reduction by taking an equal exposure to every long exposure taken at night. For astrophotography, such settings should usually be turned off.
Taking multiple Dark frames is important for the same reason as taking multiple Light frames - because a Dark frame will contain some of the Read Noise discussed earlier. An average of many Dark frames is needed to ensure that only the persistent noise is left. A stacked image created from multiple Dark frames is often called a “Master Dark,” and this calibration image will be able to subtract pattern-specific noise with much greater accuracy than a single Dark frame.
Practically, taking Dark Frames can be easily done at the end of each shooting session for those using DSLRs. I used to cap my camera and keep it in the trunk of my car while I packed up my other equipment and drove home - it would take Darks during the ride. The trouble with DSLRs is they have no method of controlling the sensor temperature, so this was just a “best guess.” Some Dedicated Astronomy Cameras can have similar problems, but many now feature onboard thermoelectric coolers which can maintain a user-specified sensor temperature which make capture of reusable Dark Frames easy. There is also the added benefit that your images will produce less noise when the sensor is colder.

A single 2-minute Dark Frame from a T3i
Readout Noise
Another similar type of pattern noise is Readout Noise, which is a variance in pixel values created by the process of the sensor generating an image from the gathered light. Analog to digital conversion is always a messy process, which is in part why we all collectively hate our printers. To isolate and subtract this type of noise the camera can be set to the shortest exposure possible, and as with Darks, the telescope should be capped while taking many exposures to eliminate the majority of Read Noise in the final stack. As these calibration frames model the inherent “bias” of the sensor, these calibration shots are called Bias Frames. The nice aspect of these is they can be reused since, being such short exposures, they are not as temperature dependent as the long exposure Darks.

A single Bias Frame (1/4000-second exposure) from a T3i, heavily brightened. While this may initially appear similar to a Dark Frame, it has vertical and horizontal banding patterns not seen in a Dark Frame
Not all cameras benefit from using Bias frames - while Dark Frames are mainly used for thermal noise, they may also contain some of the Readout Noise patterns. Many dedicated astronomy cameras are sensitive enough that they can capture photos of sufficient SNR using much shorter exposures than typically required from older cameras, and the Readout Noise may not require separate correction.
“Dither or Die”
I skipped over another step when discussing image stacking above, and that is the intermediary step of aligning all the images together. Software programs detect the stars in each subexposure and ensure that all the images are properly aligned (or registered) before proceeding with stacking. The necessity of image alignment could have multiple causes - poor tracking mount alignment, mechanical imperfections in the tracking drive, or an overloaded tracking mount could all cause your nebula of choice to drift in the camera’s field of view over time. However, this drift could also be used to combat pattern noise if the tracking system can be directed to make slight but purposeful movements in-between each shot. If this can be accomplished any remaining pattern noise which survives Dark/Bias calibration will have its pattern disrupted once each Light frame is realigned based on star positions. In other words, if the stars are all in slightly different positions with each subexposure, aligning all of the Light frames via their stars will cause any remaining pattern noise to be randomly distributed and then rejected via Image Stacking.
This process is called Dithering. Practically, the way this is performed is through use of an autoguiding camera. Since the autguider is already providing active correctional movements to the tracking platform, it can be dual purposed to also tell the mount to make slight adjustments every time the main imaging camera finishes an exposure. One of the common (and free) programs used for this is called PHD (which stands for “Push Here, Dummy”). While mainly tasked with autoguiding, PHD is also capable of communicating with most camera control programs so the capture of Light frames, and the dithering between them, can be coordinated to prevent dithering from occurring in the middle of an exposure.
I will note that I only used target drift via bad alignment or tracking as an example to segue into the topic of proper dithering, but don’t think that you can make your images noise-free by kicking your polar-aligned tripod out of place. Even after Dark/Bias calibration some noise will remain in each Light frame, and if these images were taken without autoguiding or dithering the final stacked image may suffer from walking noise, usually appearing as a pattern of banding or lines. Purposeful dithering will direct the tracking to move in random directions between each shot which will cause much greater disruption of pattern noise - while unguided target drift will often unintentionally encourage it.

A time-lapse showing a series of 180-second exposures with Dithering between every shot. The exposures slowly brighten as the target was approaching the horizon, where the atmosphere is thicker and light pollution more present.
Optical and Mechanical Issues
Solid Connections
Before taking photos, the telescope and camera should have a solid and centered connection. If the camera is secured to the telescope with thumbscrews or compression rings, it may move over time. I once spent a night in 2016 photographing the M33 galaxy but upon later examination of the photos found they were increasingly out of focus. The reason? As the telescope was understandably pointing upwards for most of the night, the camera (secured only by a single thumbscrew) slowly slid outwards about a fraction of an inch. A small change, but one which threw the image completely out of focus and rendered the photos useless. Ideally, the camera, telescope, and anything in-between the two will be connected with machined threads.
Another issue can be mechanical flexure. I used to shoot using a doublet refractor, a type of telescope which typically requires use of an additional field flattener lens. While the flattener does correct for uneven focus and gradients around the edges of the field of view, it also forces the focal point of the telescope back several inches. This requires the focus tube to be almost entirely extended in order for the camera to reach focus. Unfortunately, the combined weight of the camera (plus a filter wheel, in my case) hanging off the back end can cause a slight flex where the focus tube attaches to the telescope. With my equipment, this became such an issue that I was often unable to align images taken early in the night to an image taken later at night since, as the telescope was continually pointing at different angles while tracking a galaxy (M33, coincidentally), the amount of torque on the focuser was causing varying amounts of distortion of my photos.
A related issue for those using reflector telescopes is Mirror Flop. These designs (usually) require the primary mirror to move in order to adjust focus, and some of them are not properly secure, or at least not enough to prevent the mirror from slightly changing angles through the night. This was apparent when I shot the M13 cluster through my 8” SCT when, despite my autoguider feeding correctional data to my tracking mount, my photos showed the cluster making periodic “jumps” across the field of view throughout the night.

A series of exposures on M13 suffering from mirror flop
Calibration Frames (continued) & Flats
The next obstacle is gradients, though their specific causes can depend on both the optics and camera in use. A common large-scale gradient is light fall-off or vignetting, where the corners of the image are darker than the center. Vignetting can be caused by small diameter adapters (which can block some light from reaching the edges of a camera sensor), or using a camera sensor which is physically too large compared to the imaging circle of a telescope. A common small-scale gradient is caused by dust. Specs of dust on the telescope optics, filters, or even on the camera sensor will appear as darkened circles in Light frames.
A few paragraphs up I talked about the use of Dark Frames which isolate and allow subtraction of pattern-specific noise, and the same strategy can be used for modeling and removing gradients caused by poor optics or dust motes. However, while Dark frames require the telescope to be capped, to model the imaging field and any dark spots caused by dust, the telescope must be pointed at an evenly lit field. There are a few methods to this, including simply pointing the telescope upwards at a brightening pre-dawn sky (conveniently available at the end of many all-nighters of shooting), but a more reliable method is to use a tablet or laptop screen combined with a diffusing material like a white T-shirt. These calibration photos are called Flat Frames since their purpose is to Flatten the Field of every Light.

A Flat Frame from a Celestron 8in / 205mm diameter SCT
The goal here is to capture an photo where the Histogram is at the center, or where the majority of data is halfway between the minimum and maximum values. For DSLRs, this is as simple as turning the Camera to AV / Aperture Priority mode. Dedicated astronomy cameras can be more complicated, but many control programs have software assistants which can automatically determine an exposure time which matches a user-input histogram value. Flat Frames are usually no more than 1-2 seconds at most, though often much shorter. Since they are created using a light source which is much brighter than a typical deep sky object they usually contain a decent SNR, but will still contain some Readout noise which can be calibrated with the Bias Frames taken earlier. The critical part about good Flats is that the focus must be untouched and the camera left in place, otherwise any dust motes in the image will not be properly captured. Practically, this means taking them right at the end of a shooting session before equipment teardown.
Flat Darks
Most Flat frames will use sub-second exposures, meaning the predominant noise present in your Flats will be Read and Shot Noise. However, in the case of using narrowband filters, which cut off all but a specific bandwidth of light, and for those using CCD cameras, which are able to expose for significantly longer without saturating the sensor, much longer Flat Frames may be required. If your Flat frames tend to require longer exposure, they may generate some Thermal Noise, requiring their own brand of Darks to assist with calibration. Flat Darks are no different from regular Darks in this regard, only they are match in exposure time to the Flat frames instead of the Light frames.
The Visual Workflow Pt I
Flat Darks are not always used, which is why they are marked optional, though it should be noted that the newest cameras available may not even need Bias or Dark frames either, assuming dithering was in use and a sufficient amount of subexposures were captured
This first workflow shows the process of surgically choosing and discarding only the parts of the calibration data which are needed to then calibrate the Light Frames. As mentioned in sections above, Dark Flats are typically optional or rarely used, at least for those using CMOS cameras (which includes DSLRs and most dedicated Astronomy cameras). When not using Dark Flats, the Flat frames only require calibration from the Master Bias frame before stacking.
The Visual Workflow PT II
The Final Step in Calibration is to take the Master Calibration Frames and apply them to the Light Frames. While Bias and Dark frames are subtracted from each image, the Flat frames are divided to even out any optically-dependent gradients. As with Dark Flats, some cameras, particularly those with low Read Noise, may not benefit from Bias subtraction.
Once the Light frames have been calibrated, they are then registered so the stars in all Light frames are aligned. Once aligned, these registered and calibrated frames can be stacked into the final image which can then be edited in a photo-processing program of choice. As with all else on this page, this is a somewhat simplified description of the process. Some other intermediary steps can be taken, but mentioning any of them would warrant another paragraph or two of their own and they are typically designed for little more than optimizing the steps already listed above.
If you’re a newcomer to this hobby or simply curious about the process and have read this far, your impression may be that it seems exhausting and tedious. While capturing the data can certain involve micromanaging the telescope at odd hours of the night (at least depending on how much of the capture process has been automated), the actual calibration and stacking afterwards has been rendered largely automatic through software.
Software
Astro Pixel Processor (Pre Processing)
Deep Sky Stacker (Pre Processing)
PixInsight (Pre and Post Processing)
Sequator (Pre and Post Processing)
Siril (Pre and Post Processing)
StarStaX (for Star Trails)
These intermediary steps have now compressed what could be dozens of gigabytes of data down to a megabyte-scale file which can now be edited. To read about the changes made to the image from photo processing programs, please see Part II.