Shoot For the Moon
The Moon is probably the second-most recognizable object in our sky (I’m declaring the Sun #1 here) and one of the easier to shoot for the beginner astrophotographer. People have looked up at the Moon for thousands of years, but only since the invention of the telescope have we been able to gaze closer in and see a scarred world full of craters, mountains, and plains. While I personally find the Moon to be an obstacle for much of my photography, it still holds a certain beauty; I think Buzz Aldrin may have described it best as a world of “magnificent desolation.” With that quote in mind, which at the time I write this article is approaching the 50th anniversary since it was spoken, I will describe how to photograph our closest celestial neighbor, what equipment is needed, and other techniques to enhance your Lunar images.
Preparations
Lenses and other Equipment
Photographing detail on the Moon will require a lens or telescope or lens of at least 300mm. Higher focal lengths are preferable, but I will set 300 as a general minimum since 70-300mm lenses can be fairly low cost. For higher focal lengths camera lenses can become prohibitively expensive and buying a telescope may be a better investment. Aside from a comparatively lower cost, the advantage of a telescope is they typically feature larger apertures than a typical lens and a larger aperture means a higher resolution. Some of the best planetary images I have seen originated from 11-14 in / 280-350 mm aperture telescopes, though these will again be rather expensive to all but the most dedicated astronomers.
In my case, I use an 8in / 200mm diameter Celestron SCT, a popular scope used by many amateur astronomers and astrophotographers around the world. This telescope has a 2000mm focal length and through the use a threaded lens attachment I can reduce this to about 1366mm, making it perfect for capturing the entire Lunar disk for both crop sensor and full frame cameras.
How then does a camera even connect to a telescope? DSLRs make this connection through the use of T-Rings. These rings connect to the camera with the same attachment as your standard lens but have a threaded attachment on the front capable of connecting to a T-Adapter, which will end with other threads or tubes of various sizes. These two accessories allow the camera to connect to the back end of the telescope much like an eyepiece. The T-Ring required depends on the camera brand in question; just as a Nikon Lens will not fit a Canon camera, A Nikon T-ring will not fit a Canon camera.

A T-Ring & a 2” threaded T-Adapter - together they can attach a DSLR to a telescope
If you don’t have a DSLR, don’t worry - you can still use even a simple cell phone held up to the eyepiece on many telescopes. This type of imaging is called Eyepiece Projection. Purchasing something like the Celestron’s NEXYZ Smartphone Adapter will make this job a lot easier.

Unlike Deep Sky imaging, which often requires long exposures of multiple minutes, the Moon is bright enough that sub-second exposures are all that is needed. As such, a tracking mount is not required, so even those with Dobsonian telescopes will be able to attempt some planetary imaging as long as they don’t mind periodically moving the telescope. Tracking mounts are still desirable, especially when photographing the Moon (or a portion of it) over an extended period of time or in the construction of mosaics.

The Moon at various focal length (via Stellarium)
Ideal Conditions
For most of the suggestions I will make on imaging the Moon, I will be assuming both that the skies are clear and that the Moon is well above the horizon. Photographing a Moonrise near the horizon can produce beautiful images, but often more in relation to foreground objects or the distorted color of the Moon through our atmosphere; most of my focus for today is capturing detail of the Lunar surface itself.
As with other forms of night sky photography, clear skies are optimal, but the generous glow of the Moon can “brute-force” its way through thin cloud cover or haze to an extent. Waiting for the Moon to approach zenith will mean that there is a minimal amount of atmosphere to distort the incoming light. For wider focal lengths of ~300mm this is not as much an issue, but at the 1000mm+ often used for photographing surface detail, shooting near zenith allows a definite increase in image quality.
Coupled with this is the quality of the air itself, a term generally known as “Seeing” conditions to astronomers. Seeing indicates how clear or turbulent the atmosphere is and is determined by a multitude of factors including humidity, dew point, local jet stream activity, and the presence of upwind forest fires (or just wind gusts picking up dust). As mentioned, Kansas tends to be suffering from one or more of these at any given time, making Good Seeing a rare occurrence. For Seeing forecasts, I like to use Clear Dark Sky, which has dozens of weather stations scattered in Kansas and hundreds more in other states.
The exception to waiting for the Moon to be higher in the sky is when the Moon is a thin crescent - as this phase only occurs when the Moon has a low angular distance to the Sun it will inherently be lower in the sky and unavoidably near the horizon while the Sun has set.
Planning for Lunar Phases
This leads one more consideration - the Moon’s phase will change each day. A thin crescent Moon will soon become a waxing gibbous and then a Full Moon, and between each night the Moon will have moved several degrees east across the sky. As the Moon orbits the Earth it changes phase and different details will become prominent on different days. A First Quarter Moon (Half Full), which is conveniently high in the sky during sunset, will show considerable shadow contrast on its craters. A Full Moon, by comparison, will be quite luminous but will display little amounts of contrasting detail since the sun is almost directly overhead.

The southern region of the Moon, slightly past First Quarter (left) and Full (right)
Searching for online lunar calendars or using apps (including Stellarium, or Time and Date) which show the Moon’s phase over time are a good way to plan for this. Lacking electronic help, just remember that around 7 days is equivalent to about a 50% phase change; a 25% Moon will be 75% in a week, and a Full Moon will recede to Last Quarter (Half-Full, but Waning) in the same amount of time.
As the phase changes so does the Moon’s position in the sky for a given time of the day. A 7-day period means 90 degrees of angular movement around our sky - a First Quarter Moon will be high overhead at sunset since it is at 90 degrees to the sun, but a week later during Full Moon it will be almost exactly opposite in the sky as our sun (or 180 degrees away). Keep this in mind when planning your photography - the inexperienced astrophotographer (and experienced ones too if I am being honest) may intend to photograph the Moon several days in the future when the forecast predicts a clear night, but when the day arrives they find the Moon is not going to rise until 2am!
SHOOTING
Focus
Focus is critical to Lunar imaging and its importance scales with the amount of focal length in use. Changes in temperature will physically stretch or compress optical systems a small amount, and this small amount can make the difference between a crisp lunar image and an photo which looks vaguely like a bright tortilla. With this in mind, try to allow your optics time to reach the ambient outdoor temperature before shooting, and take your time in finding the right focus.
Once all equipment is setup and trained on the Moon, use the DSLR live view mode to zoom in on the edge of the Lunar surface or along the terminator if it is in partial phase. Every DSLR that I have seen will show no more than 10x in live view, but this is enough to examine some of the smaller craters as you slowly adjust the the lens or telescope into focus. I would also advise disabling any autofocus or stabilization features if you are using electronic lenses; they will be of little use here.
Those using telescopes for focus may benefit from using fine-focus knob, if available, or other means of fine-tuning the focus. Some telescopes may include a smaller focus knob which moves the focus at a much lower rate which makes this easier. However, if a fine-focuser is not present on a telescope, upgrading to one may be expensive. One of the best ways to allow fine-adjustments on focus is to increase the focus knob diameter; in the case of my telescope, I use a 3d-printed “wheel” which slips over the focus knob. Other have used similar methods like looping a rubber band between the focus and stretching it out to their hands - in this manner, slightly rolling your wrist back and forth will make fine adjustments to the focus.
Turbulence & Proper Exposure
Those familiar with astrophotography may know that deep sky images of nebula and galaxies are the result of many images averaged together for noise reduction. As bright as the Moon is, some random noise will still exist in each camera image, making image stacking just as applicable here. As such, I will often shoot at least 40 images of the Moon when using my DSLR.
This is also an aspect of photography where dedicated astronomy cameras reign supreme. These cameras have no moving parts and can record thousands of images over about a minute, and as they often have smaller pixel sizes in comparison to a DSLR, they can often capture smaller details (all else being equal). High-speed imaging is beneficial in that even with relatively mediocre Seeing conditions, the constant dance of the turbulent atmosphere above will sometimes force the Moon into near-perfect focus. There is, then, a higher chance of capturing these in-focus frames, even if these good sub-exposures only total a few hundred out of ten thousand, which is why this technique is called “Lucky Imaging.” Specialized software like Autostakkert (available for free, by the way) can analyze these images and stack only the best ones, resulting in a sharper stacked image (more on that further down).
Single image (left) compared to 500 images stacked (right)
You may wonder if the video mode available on most DSLRs allows similar rates of capture, and while the higher amounts of frames captured in a video may have some benefit over fewer single-shot RAW images, there are some disadvantages as well. Video mode captures are usually much lower in resolution than a typical RAW image, and most DSLRs (all of the cameras I have used, anyway) save video mode captures as a stream of 8-bit JPG images, so the resulting images will have much less dynamic range.
Proper exposure settings will vary between cameras and optics, but as with exposing for bright objects in the daytime, aim for the histogram to be between one-third from the left and halfway across. As an aside, the Moon is surrounded by the darkness of background space, so there will always be some “data” stuck to the left-side of the histogram. In my case, shooting with my 2000mm f/10 telescope and Canon T3i usually means an exposure of about 1/1600th at ISO 800.
If you are using a cell phone through eyepice projection, you may not have as much fine control here, but some newer smartphones do have a Pro Mode which saves images as Raw files.

An underexposed, properly exposed, and overexposed image of the Moon
The other parameter is to watch two areas on the Moon prone to overexposure, namely the craters Proclus and Aristarchus. Even if the Moon appears properly exposed in a test shot, close examination of the right edge of the Histogram may show that these craters clipped white. The solution here is to either reduce the exposure until these craters are properly exposed or to take 2 sets of exposures - one for the Moon, and one, slightly reduced, for the bright craters - and to then later combine them to compress the dynamic range of the image.
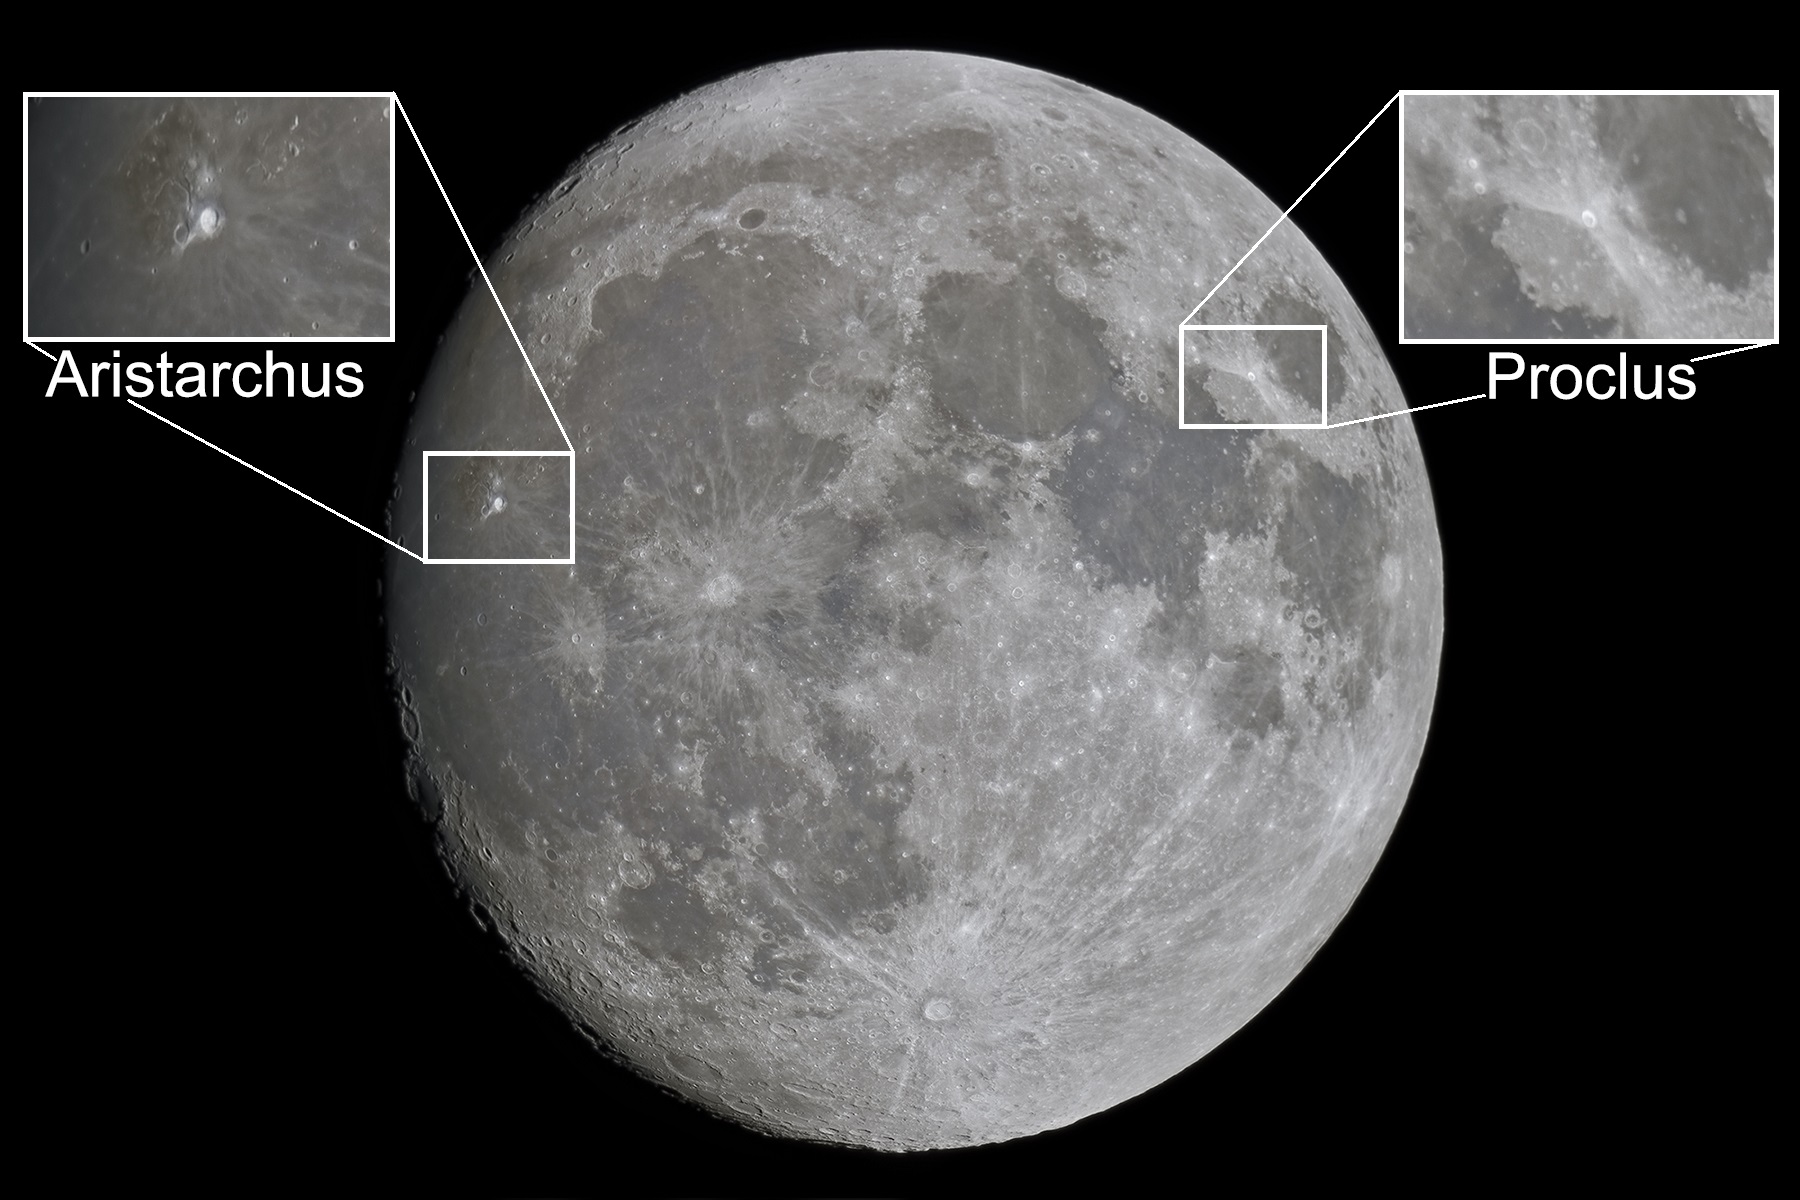
These two craters are notorious for clipping white
I tend towards the first method because an integrated (stacked) image will be more lenient with post-processing edits to Levels and Curves. A single exposure of the Moon will contain some random noise, so if the images are slightly underexposed in order to retain detail on those two problematic craters, brightening the rest of the Moon will stretch this noise as well, possibly causing a grainy result. In contrast, an integrated image of the Moon made from hundreds (or multiple thousands) of sub-exposures will contain almost no noise and will have higher tolerances for such adjustments.
Different Ideas for Lunar Imaging
Double Exposures
One effect I often see in Moon photos is the use of a double exposure to add a glow around the Moon. This can be done at any focal length which allows the full disc of the Moon to be photographed. The basic premise is to take one (or more, for image stacking) proper exposures of the Moon, then take longer exposures which cause the Moon to clip white. Blending the two together with selective masking will result in an image of the Moon with a glow on its edges. The presence of some clouds or haze may also add to the glow as it did in the following image.
I have not made many attempts with this technique, mostly because my equipment is specialized towards longer focal lengths. Shooting with this method in sub-optimal conditions (read as: hazy or worse) is usually contrary to my goals in the first place, which is to photograph close-up and clear detail of the Moon, so I don’t usually consider thin clouds to be any kind of bonus. The example I have here was taken about 2 hours before the start of a Lunar Eclipse in January 2019, and since I already had my camera set up in a relatively wider-field telescope this image was a target of opportunity.

A double exposure of the Full Moon. In this case, the longer exposure also revealed foreground cloud details
Double exposures can also capture Earthshine, a phenomena which is easiest to see when the Moon is below First Quarter (Half Full). Earthshine is the result of sunlit which has reflected off the Earth illuminating the “dark” side of the Moon. This can easily be seen with the unaided eye, but cameras have a tough time capturing this due to their lacking dynamic range. An exposure which captures the sunlit crescent will show nothing on the “Earthlit” side of the Moon, and most exposures which reveal the Earthshine will display the sunlit side of the Moon as completely whited out.
Capturing this can be difficult as the Moon’s phase grows - too much and the glow of the longer exposures may erase some detail along the terminator and in the darker regions of the Moon, which can be seen here. I like to take more capture sets than what is minimally necessary, but I would rather have the data than realize several days later that I am unable to effectively process the image because the exposures are insufficient. I like to start with either the Earthshine or the Lunar Crescent, and once shot, the next exposure is either multiplied or divided by 4. For example, starting with 1 second exposures, my next steps would be 1/14, 1/15, 1/60, and then shoot the crescent itself.
Combining all of these exposures (see the further down on stacking) is a matter of masking. Starting with the longest exposure, I use a copy of the image as a mask when applying the shorter exposure on top. This causes the regions which have been clipped white to be unprotected from the application of the shorter exposures (which contain detail in these regions). Doing this through all of the exposures (plus a little mask blurring for transition regions) can yield an impressive result.

Earthshine captured with 1, 1/4, 1/10, and 1/400th second exposures
Full Disk & Closeups
Deep field Lunar imaging can reveal incredibly small details across the Moon. Craters, hardened lava fields, mountains ranges, rilles, and more all become especially visible at longer focal lengths. The Moon’s diameter is a few hundred miles short of the distance between New York City and Los Angeles, so the detail found in focal lengths of 1200mm or more (assuming a decent aperture size) can be on the order of one or two kilometers per pixel in detail. Timing your photos for the right partial phase of the Moon can enhance this even further - a small boulder can still cast a long shadow, after all.
Closeups of the Apollo landing sites may also be of interest, though I should add that no telescope on Earth will be able to resolve the lunar lander or the flag since resolution scales with aperture (capturing such small details would require a telescope more than twice as large as any under development). This is another good reason to shoot the Moon in partial phase; the shadow contrast will permit more detail on smaller surface features. In this image below, the curving Hadley Rille (the little squiggly line to the right of the red dot) traces it way from the Apollo 15 landing site right to the foothills of the Apennine mountains, appearing much like a dry riverbed (though it is not). The Hadley Rille is only 1.5km wide, and would be effectively invisible during a Full Moon, but just past First Quarter it is plainly visible both in eyepieces of decent magnification (plus clear skies, large apertures, etc, etc) and cameras with sufficiently small pixel sizes.

The Apollo 15 landing site located near the northern end of the Apennine mountain range
Mosaics
Most DSLRs coupled with a telescope of at least 800mm focal length can capture incredible details on the Moon, but there is still more detail to be found through the use of higher focal lengths. This is where a tracking mount is all but required, as taking multiple images of the Moon at effective focal lengths of 3000mm+ by hand would be quite frustrating, especially when using video captures of more than several seconds.
One of the more difficult aspects of creating mosaics is ensuring that the entire Moon has been captured. One one occasion, several days after capturing 55 panels of Lunar data with a small planetary camera, I found that I had missed a noticeable sliver of the Lunar surface between all of the panels. Subsequent efforts have taken more care in avoiding this issue; in that case, I had fortunately taken additional Full Disk images with my DSLR which were blended over the missing area.
The best method I have found for capturing a Lunar mosaic in its entirety is to track landscape features on the Moon for each panel. When photographing each section of the mosaic I pick out a prominent crater or landscape feature. When that panel is complete and the telescope is adjusted to point at an adjacent area of the lunar terrain, I watch this part of the landscape and ensure it appears at the edges of both panels, thereby ensuring a sufficient amount of overlap between panels.
To make panel capture easier, rotate the camera in the telescope so that the movement between panels on the laptop screen correctly corresponds to the button pressed on the hand controller for your tracking mount. Doing this ensures moving between panels will not be in a diagonal direction and will generally ease your efforts in tracking which parts of the Moon have already been covered. When imaging a thin crescent Moon sometimes I will also rotate the camera between each panel simply to reduce the total amount of required panels.

A 17-panel mosaic from May 2019 prior to final merging - note that the image is flipped since my telescope uses mirrors
Creating a mosaic using a high-speed capture can offer one other challenge; lack of hard drive space. The 17-panel mosaic above totaled almost 100GB of video files. The storage size of such projects will greatly vary based on multiple factors including focal length, camera resolution, the bit-rate of the camera and of course the recording time spent on each panel. Along with the much higher required hard drive space, the processing time for these images can be excessive. Each video capture must be analyzed, aligned, and stacked, and then each resulting stacked image must be aligned into a mosaic. Only at this point can you begin to process the final image. Since even those with multiple terabytes of storage will quickly fill up their space when a single Moon image can begin as 100GB of video files, I typically only keep the individual stacked panels and delete the videos once the project is completed.
Post Processing & Other Edits
Importing RAW Images
The first step I like to take when importing DSLR shots is to mass-convert them to .TIFF files as some astro-processing software does not know how to work with RAW files. I use this as an opportunity to adjust the white balance to turn the Moon to a more neutral grey as well as remove chromatic aberration under Lens Correction, which is the red / blue color fringing on the edge of bright objects. From here, the TIFF files can be stacked into integrated images for further processing.

Before and After White Balancing from my IR-modified Canon T3i
Stacking the Image
Stacking can be accomplished through various software. Photoshop is generally capable of stacking Lunar images (including RAW files); I have had success with stacking upwards of 500, though it can take a few hours, and as far as I know this feature requires the extended edition of Photoshop. After loading all images into a stack and auto-aligning them, convert the aligned stack into a Smart Object, and blend them all together using Median blending. If the images have been properly aligned the result will be a mostly noise-free image of the Moon.
The caveat to this is that Photoshop seems incapable of doing this unless part of the Moon is out of view, meaning all of my Photoshop-edited Lunar images were formed as mosaics of 2 or more panels. My best guess is that the sharp corner of the Moon disappearing off the camera’s field of view somehow allows Photoshop to align the images better than the entire Moon sitting on a black background. I’m just a dedicated amateur though, I don’t have all the answers!
If Photoshop is unable to align your images, a better alternative may be a program like Autostakkert - this free program is used by many astrophotographer to stack planetary, solar, and lunar images. In the case of taking high-speed video captures Auostakkert is also my software of choice and it is quite capable of churning through tens of thousands of frames to find the best ones to use (even if it does take some time). Using this software is fairly easy, but I’ll leave the specific how-to’s for a future article. As it stands now, many tutorials can be found on various websites, including Youtube.
Deconvolution and Sharpening
Great, you have a stacked image - now what do you do with it?
Even with good Seeing, high quantities of captured images, and large optics, the final image will still experience some blur from the atmosphere. In my earlier Lunar images I would simply sharpen the images, and thought the result was detailed, it was also easy to overdo and sometimes made the image noisier. PixInsight’s Deconvolution process is now my go-to choice because it avoids these issues, but Photoshop has some tools to help with this as well.
Everyone does this a little differently, but two of the main tools are Smart Sharpen and Unsharp Mask. The former allows selective amounts of sharpening at varying pixel scales along with noise reduction using different models, including sharpening through reduction of lens or motion blur as well as reducing Gaussian blur, which is typically the most commonly-used mode for me. Finding the right values, as with many other steps, is a result of experimentation. For many images, the majority of the detail will be in single digit pixel ranges, with most of the noise being in scales on the lower end of this. For this reason, I usually apply higher amounts of noise reduction in smaller scales, more sharpening in midrange scales, and little to none of either on larger scales (10 or more pixels in my case).
Unsharp Mask is essentially like Smart Sharpen used in Gaussian blur mode, at least as far as we are concerned here. If I use this, it is applied multiple times at different scales and I usually reduce the opacity of each successive layer as the pixel scale of the sharpening rises.
In both of these cases masking out the brighter areas of the Moon is advised. Sharpening increases the contrast between light and dark areas of the image, so bright areas like the edges of sunlit crater rims often clip white and lose detail or form ringing / halo effects. The bright edge of the Moon is especially prone to this, so take care in masking out the edge of the Moon when sharpening your images

No Sharpening (Left), Correct Sharpening (Middle), Too much Sharpening (Right)
As helpful as Photoshop sharpening is, it does not match the detail recovered with a proper application of PixInsight’s Deconvolution process. The basic function of Deconvolution is to compare a perfect star (such as one captured by the Hubble, which experiences no atmospheric blurring) to a star in a ground-based image, model this difference, and then apply this model to the image to recover the lost detail. Images of the Moon typically do not have visible stars, but the theory and the software do not mind. Though some experimentation is required, finding the right pixel scale will allow PixInsight to tighten up considerable amounts of detail. In some cases Deconvolution is often so effective that I am unable to apply further sharpening without causing the image to appear over-processed.
PixInsight is an excellent set of software tools for the astrophotographer but is both expensive and complicated, so while I feel as though I should at least mention it, proper use of the deconvolution process would require an entire article on its own and would probably be longer than what you’re reading now. For those who want to learn more, there are tutorials (and even books) which cover this topic more comprehensively than I can, and the scope of this article is more aimed towards those who likely do now own PixInsight in the first place.
Turning up the Color
Contrary to most photos you may have seen, the Moon is not monochromatic. Turning up the saturation will reveal the rich orange and blue colors spread across the Mare (“Seas”); these colors indicate concentrations of certain materials, including silica, iron oxide (rust), aluminium oxide, and titanium oxide.

While the saturation in this image has been increased, these colors are perfectly visible to the human eye when observing the Moon, especially in the color contrast between the Seas of Tranquility and Serenity
Revealing these colors is not as simple as turning the saturation up to 100, first because noise reduction should precede any attempts in raising saturation, and second because cranking saturation to maximum looks terrible. Reducing the color noise can be easily accomplished in Photoshop by targeting the “Reduce Color Noise” slider and leaving the Luminance noise reduction untouched. Color noise itself should be fairly minimal if the image is made from dozens or hundreds averaged together - about the only discoloration to deal with concerning an integrated image is chromatic aberration on the edges of the Moon which should have been mostly removed during the RAW to TIFF conversion.
Another method of reducing color noise for larger scales is to blur the image. In Photoshop, copy the image to a new layer, blur it by several pixels, and then set the blending mode to Color. This will blur the color while maintaining the luminance detail. Masks can be used with heavy blurring to selectively target the bright edge of the Moon to remove any residual color fringing as well.
Increasing Contrast
One of the last steps I take in my images is to adjust larger scale contrast using Curves. Images with increased contrast will often appear more dramatic or more eye-catching, and the increased contrast will also call more attention to large-scale features. In some ways, this step could be called “large-scale sharpening” since increasing contrast is effectively how some sharpening processes work.
For the Moon, these large scale areas will include transitional areas between the smooth Mare and cratered regions as well as the “splash” details surrounding some craters

Craters Copernicus (upper) and Kepler (lower), before and after an increase in large-scale contrast
Such adjustments are often better left reasonably subtle. To put it a different way, if you are not sure if you are applying too strong of a Curve to an image, reduce its application slightly - doing so is usually better than risking overprocessing the image. This advice on subtly really goes for all these steps, by the way. Sharpening, increasing color, and other adjustments all allow the Moon to look much more interesting than it does to the naked eye, so squeezing every last drop of color and detail out of an image is sometimes not the best strategy. I can’t tell you exactly how much to use because every image is different and in the end it is subjective (astrophotography is science and art).
From here, what you do with the image is up to you. Share it with friends, frame it, or delete it and try again because you want to do better. I have kept most of the Lunar images I have taken since I started this hobby because they remind me of what I have learned doing these processes again and again. As long as each photo is at least a little better than the last one I know I am going in the right direction.
I hope this article will be helpful to your efforts in photographing the Moon. For thousands of years peoples around the world have described the Moon for their own purposes. Some said it was a god, some believed it was the location of the afterlife, and others imagined it a lush world of oceans and life much like the Earth. Today we know it is a barren rock; a sun-bleached and scarred landscape of irradiated dust. But a hostile environment can also be beautiful; even on Earth we are fascinated by storms, volcanoes, and harsh landscapes like the South Dakota badlands. For the astrophotographer, photographing extreme environments like stars, stellar-formation nebula, or supernova remnants feels like business as usual (as long as we can keep our distance to that last item). Today, with the Apollo landings approaching 50 years of memory, every image of the Moon is a reminder of what we have reached, and what we will reach again in the future. I hope that in the future, another article like this may be written, but instead of lunar photography, perhaps they will discuss the finer points of taking images of the Earth from the Lunar surface.